BLE COVID Test #2: Jeff Probe + nRF52810
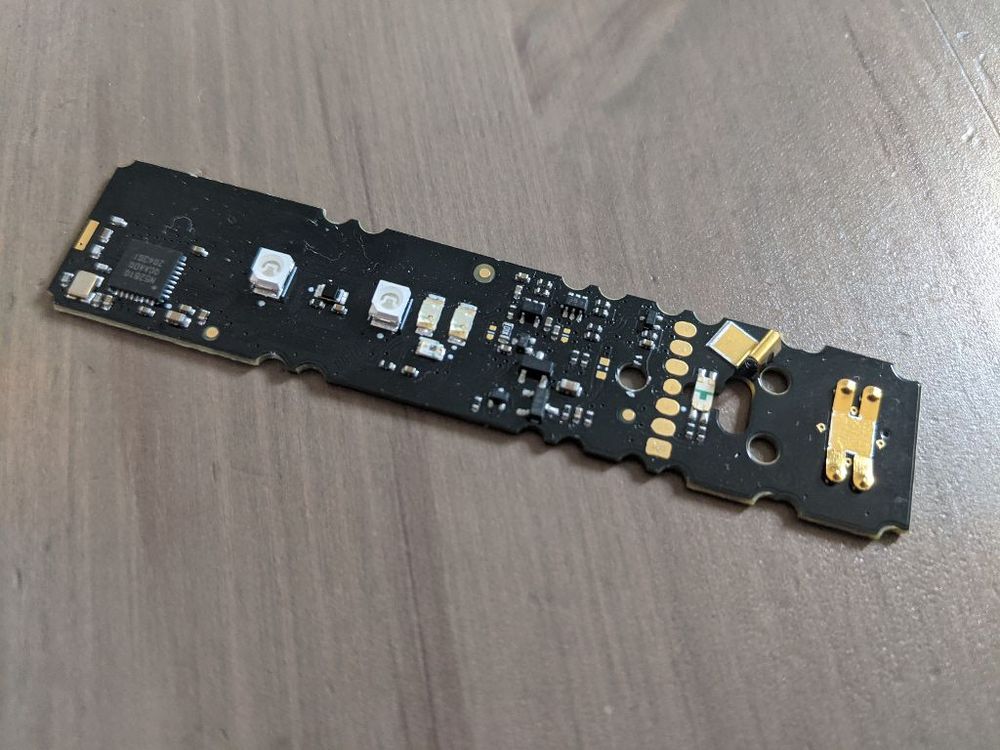
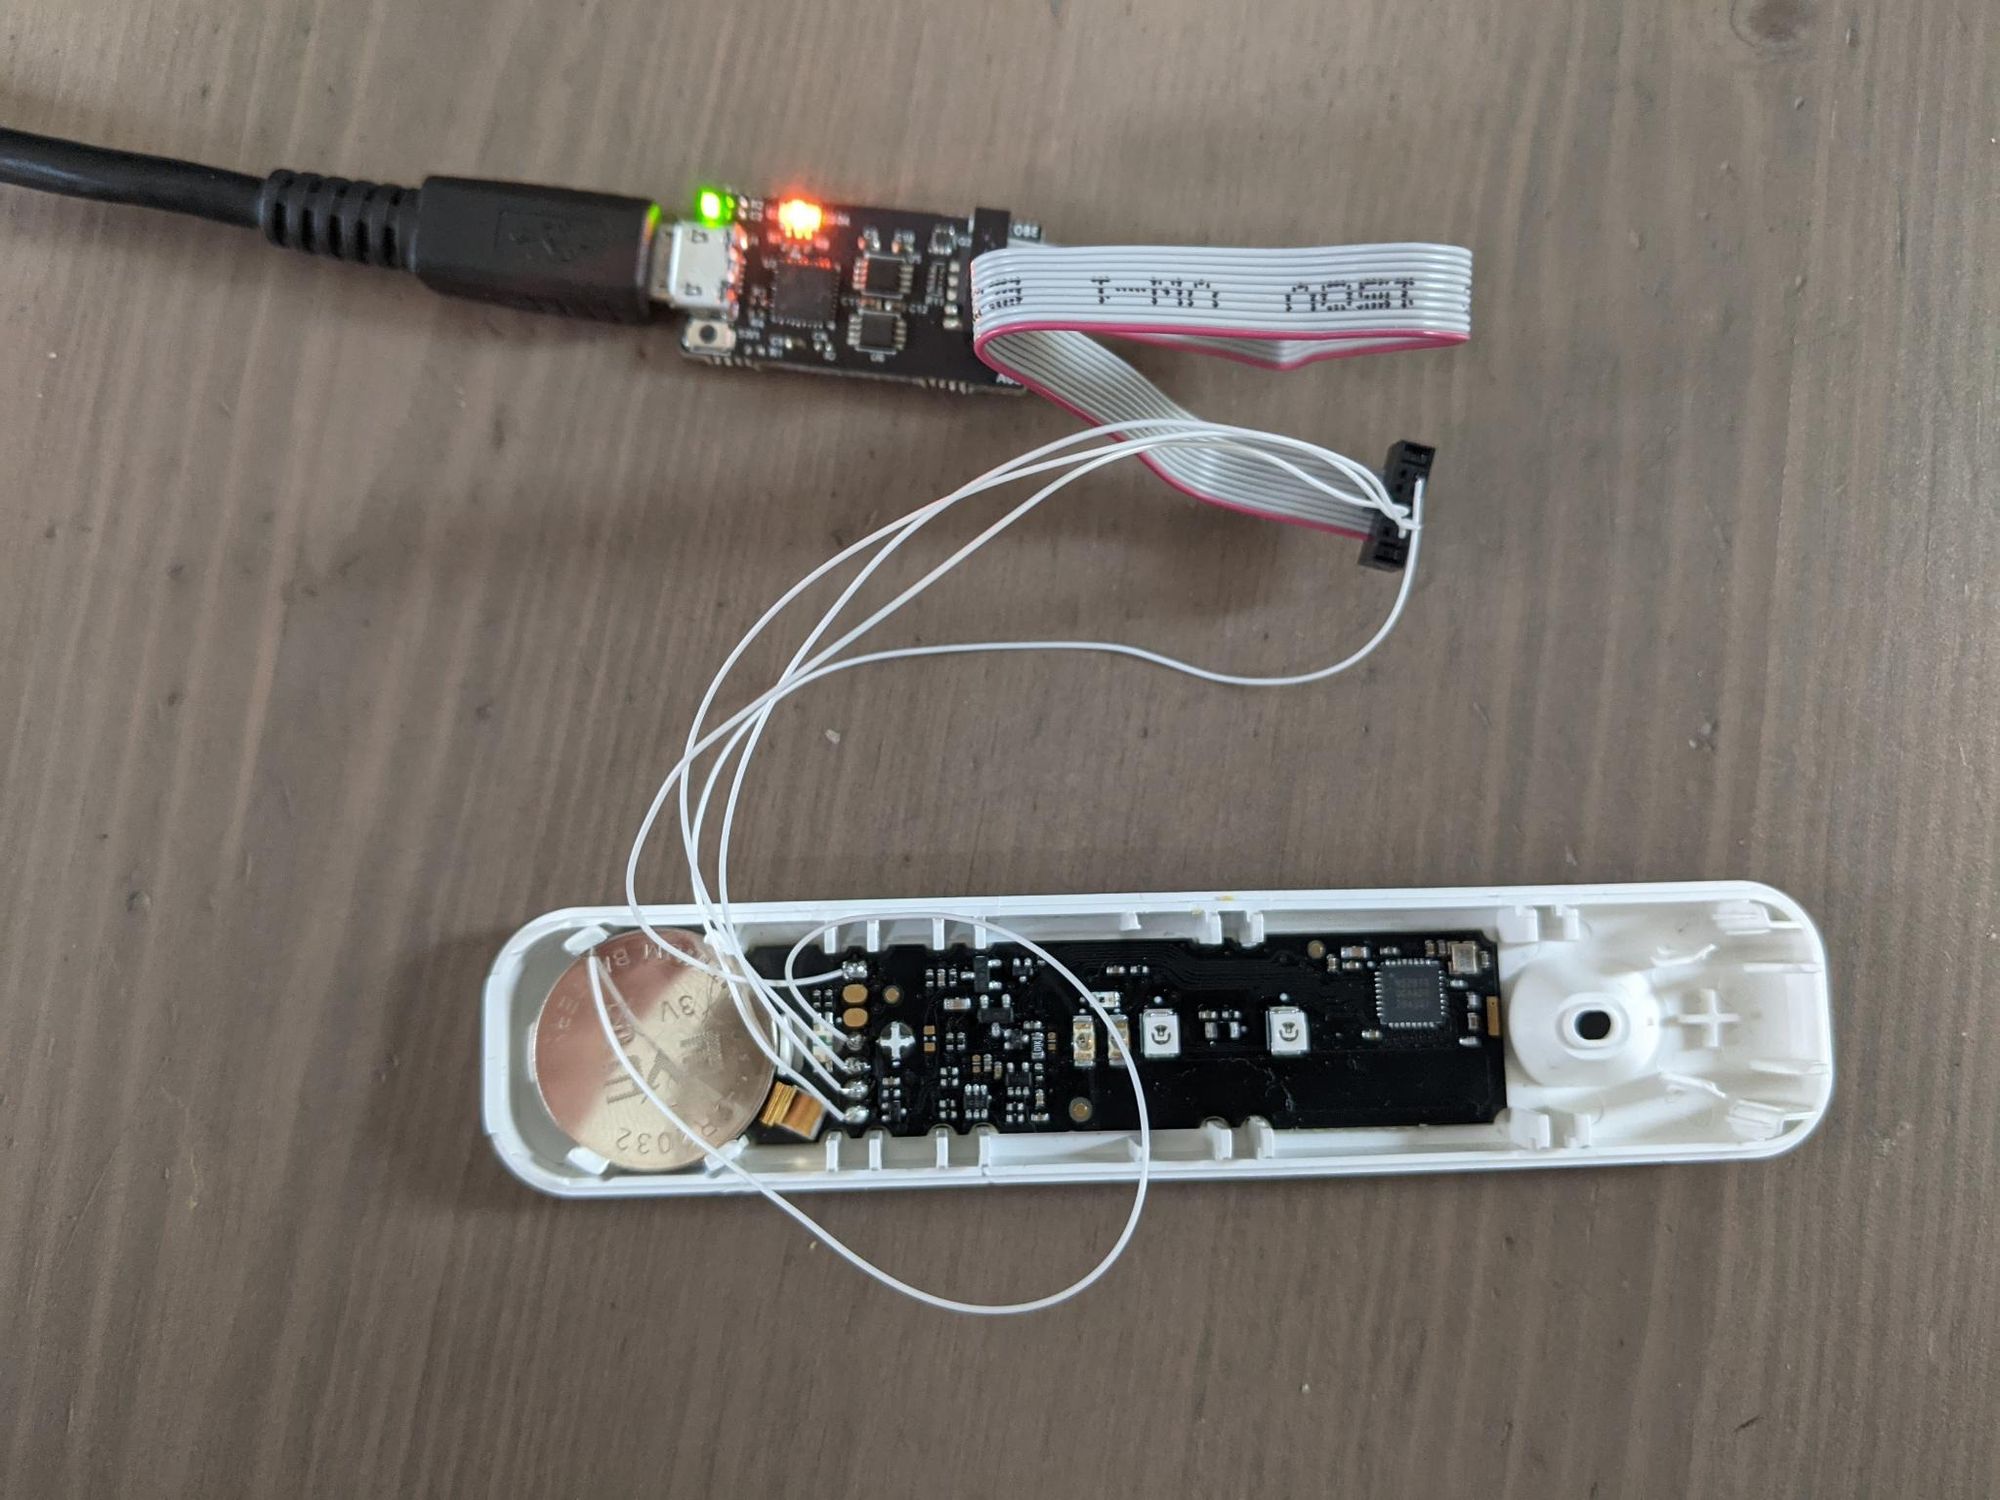
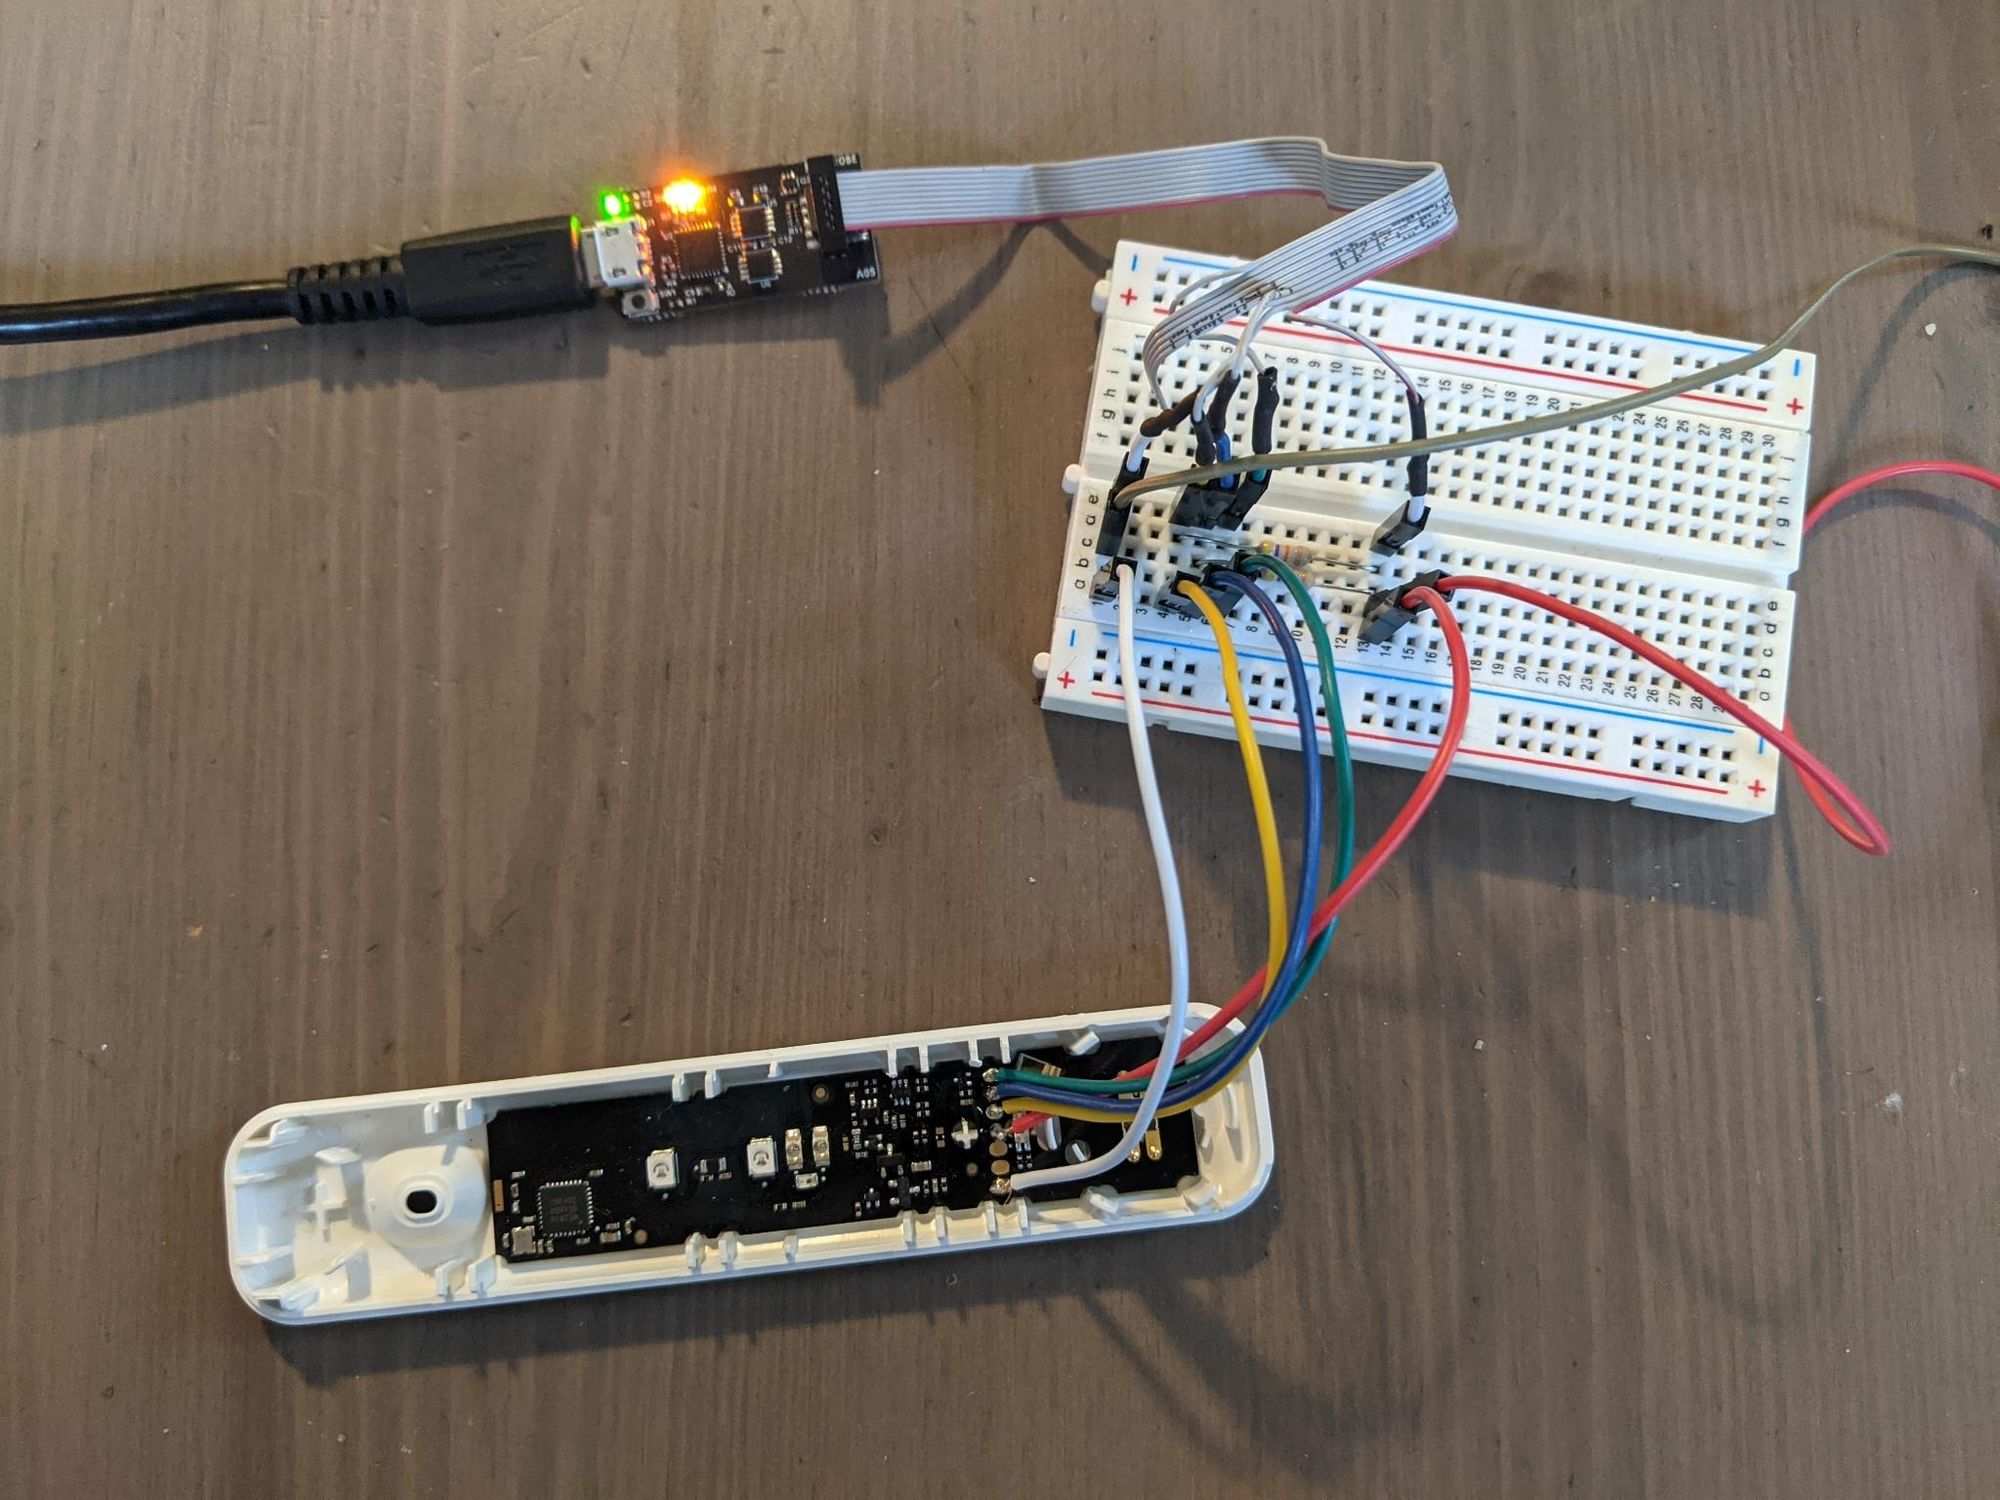
Next in my list of things to do with this COVID test is figure out how to program it/erase it using the programming port I mentioned previously. I acquired a Jeff Probe - a Blackmagic-based/compatible multipurpose JTAG device, which I was going to try to use for this.
Things didn't just work out of the box; of course they didn't!
First off, I didn't realize the IDC connector on the Jeff Probe was 1mm pitch, rather than the 2.54mm I had in my brain. So much for my plan for soldering some wires onto the board and simply jamming them into the IDC cable holes - they're too small. I tried using some very thin wire...
But even after I mostly stopped the wires popping out of the IDC connector, things weren't happening - the probe wasn't finding the MCU:
(gdb) target extended-remote /dev/ttyACM1
Remote debugging using /dev/ttyACM1
(gdb) monitor swdp_scan
Target voltage: 3.3V
SW-DP scan failed!
I figured I needed pullups on the clock and data lines and/or a better connection, so I slowed down, put things on a breadboard with some Dupont wires, and legitimately tried make an okay job of it. It felt slow and tedious, but worth it - I didn't have to worry about wires popping out or snapping as 30AWG tends to do.
But even with all that...
(gdb) monitor swdp_scan
Target voltage: 3.3V
SW-DP scan failed!
Arg!
I figured I needed the source code for this thing to better understand what could be going wrong; this was easy enough to get hold of - I just cloned the Blackmagic git repo. I also figured I should update the firmware to the latest, because why not!? Maybe it will fix my problem. So I make'd the Makefile after taking care of some dependencies, and used the dfu-util tool to download the generated file to it. And...it stopped working completely! Unplug...replug...nothing; nothing even in dmesg!
I panicked a bit, concerned I had bricked my brand new probe. Fortunately after messing with the button on it, I found that plugging it in *while* the button is depressed puts it in some bootloader mode, where at the very least you can install new things on it; so it wasn't bricked! Still didn't work though...
I realized my error: I needed firmware built for the Jeff Probe, duh! Not the blackmagic probe. They might be compatible from a user perspective, look similar and run largely the same software, but they have different MCUs, different peripherals etc; I'm not sure how I expected it to work.
So I acquired the Jeff Probe fork of the firmware, built it, downloaded it and... same problem; I was befuddled! How is anyone supposed to use this? I spent ages trying to figure it out, incl. manually messing around with the existing supported platforms to match the Jeff Probe (a dangerous game that risks overwriting the bootloader) - my hopes were low and I was almost ready to throw in the towel and just buy a Blackmagic probe so I could get on with my project. Then, somehow, I noticed something: the Jeff Probe repo has a branch called "sam". I checked it out in my repo and lo and behold there it was - the platforms/sam/jeff directory! I had a good feeling about this. I built and downloaded it hungrily....it worked normally! As above, it still didn't find the nRF52810, but I was now able to build firmware from source code - that's some kind of progress!
So while the latest Jeff Probe firmware does seem to support some nRF52 chips (see src/target/nrf51.c), it doesn't support the Control Access Port or "CTRL-AP". This is needed to re-enable access to the main debug port, if it has been protected. So I tried to backport the code to support this, from the original blackmagic repo. After a lot of messing around (things had not changed too much since the Jeff Probe fork, but they had changed somewhat) I got it building.
I downloaded and connected everything, and it showed the access port in the scan! This is the first hard evidence I've had that the wiring is good, and the debug port isn't disabled some other way, so I am super pleased about this.
Attaching seems to be a problem - the probe stops responding... more staring at code... I find that my backported code needs to initialize a struct to default values, which in the modern codebase has been refactored to be done elsewhere. I added the following nonsense to the appropriate place:
t->attach = (void*)nop_function;
t->detach = (void*)nop_function;
t->check_error = (void*)nop_function;
t->mem_read = (void*)nop_function;
t->mem_write = (void*)nop_function;
t->regs_read = (void*)nop_function;
t->regs_write = (void*)nop_function;
t->reset = (void*)nop_function;
t->halt_request = (void*)nop_function;
t->halt_poll = mdm_halt_poll;
t->halt_resume = (void*)nop_function;
and it works! I can now both scan and attach to the Access Port without the probe crashing!
(gdb) monitor swdp_scan
Target voltage: 3.3V
Available Targets:
No. Att Driver 1
      Nordic nRF52 Access Port (protected)
(gdb) attach 1
Attaching to Remote target
warning: while parsing target description: no element found
warning: Could not load XML target description; ignoring
PC register is not available
Here we see the access port is indeed "protected", so we need to unprotect it via the monitor erase_mass command:
(gdb) monitor erase_mass
(gdb) detach
Detaching from program: , Remote target
(gdb) monitor hard_srst
(gdb) monitor swdp_scan
Target voltage: 3.3V
Available Targets:
No. Att Driver
1      ARM Cortex-M
2      Nordic nRF52 Access Port
After resetting the chip, "ARM Cortex-M" is clearly visible as another target, meaning I have successfully erased the firmware, unprotecting the debug port; w00t!
I next try attaching to the "ARM Cortex-M" target; it complains about a missing memory map, but registers are accessible. On the missing memory map, more poking (peeking, rather) reveals my chip's device ID is not present in the hard coded list and the probe isn't identifying it as specifically an nRF52; it's falling back to a generic "Cortex-M" CPU target. It looks like the latest blackmagic firmware (from the original blackmagic repo) dispenses with the list and handles things differently, with ignorance of the device ID - probably a more robust approach, as this ID seems to change with chip revision.
Rather than backport these changes too, I simply added my chip's device ID to the list of known nRF52 devices. Rebuild, download, it works:
(gdb) mon swdp_scan
Target voltage: 3.3V
Available Targets:
No. Att Driver
 1      Nordic nRF52
 2      Nordic nRF52 Access Port
(gdb) attach 1
A program is being debugged already.  Kill it? (y or n) y
Attaching to Remote target
warning: No executable has been specified and target does not support
determining executable automatically.  Try using the "file" command.
0xfffffffe in ?? ()
0xfffffffe in ?? ()
(gdb) info mem
Using memory regions provided by the target.
Num Enb Low Addr   High Addr  Attrs
0   y  	0x00000000 0x00030000 flash blocksize 0x1000 nocache
1   y  	0x10001000 0x10001100 flash blocksize 0x100 nocache
2   y  	0x20000000 0x20006000 rw nocache
(gdb)
AAAAAAA that was so much messing around!
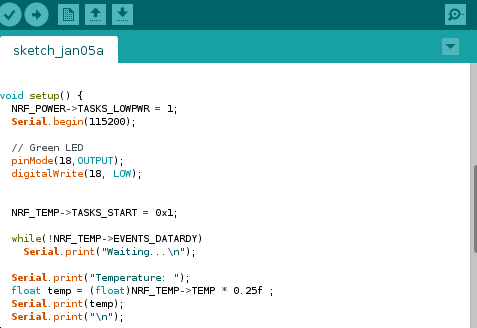
This should be everything I need in order to get code into the chip, and maybe even debug it.
Here's the repo:
 routevegetable
Building & Downloading the firmware is simply a matter of:
make PROBE_HOST=jeff
...
...
...

sudo dfu-util -d 0000:0000 -s 0x2000:leave -D src/blackmagic.bin
Next up, i'll be trying to run some actual code on this thing!